Bob Gumm

Order this book online at Borders.com
Mr. Thawley, please e-mail Bob Gumm. Thanks!
* Some pages require Microsoft Word and Excel v7 for Windows95 �.
Just to the right, is a drawing of the factory V8 motor mounts. The drawing is in error though, it shows the engine facing towards you. In-fact the engine compartment is actually represented as though you were looking down into the engine compartment from the vantage point of the passenger side door. The mounts are shown with the nutplates of the mounts bent rearward, and the distance between the front bolt holes in both the left and right frame mounts are further apart than the rear holes. The holes in the frame mounts are also elongated front-to-rear on the driver's side and right-to-left on the passenger's side. If I've confused you enough, look at the photo below of my engine compartment and the motor mount photos for clarification. My Monza was a factory V8 model and I had the driver's side factory rubber mount welded solid after blowing all the rubber out with a cutting torch. This was done to stabilize the engine and to help keep it at a specific height since the factory mount sagged from the weight of the engine causing it to lean slightly. Also, because I use Hedman Hedders and don't use a V8 adapter kit, I had to modify my factory V8 frame mounts to clear the headers since the headers are not designed to fit factory V8 installations. For more on headers, see my V8 Exhaust FAQ.


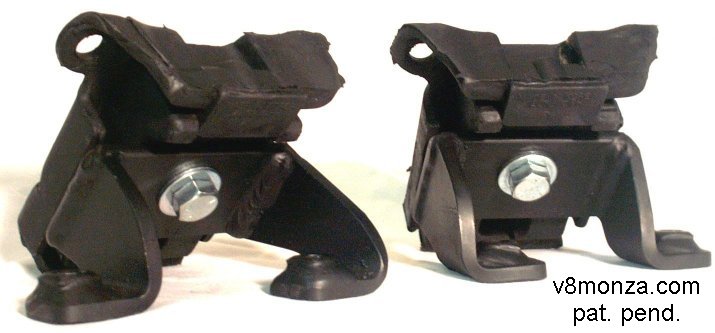
Above is a set of v8monza.com designed factory V8 motor mounts. These mounts were designed by Bob Gumm of v8monza.com as a direct replacement for the factory mounts. However, these mounts are designed to use readily available early Chevy truck motor mounts and they won't sag like the factory mounts do. To order a set, see our catalog.
Most all of these kits are made for the Chevy Vega, but since all H-Bodies share the same basic undercarriage and floor pan, they should fit them all! I don't have information on all of these kits, but as it comes in I'll post it.
Now available through us, the Don Hardy the V8/V6 Vega kits were designed for the 1971-74 Vega and are some of the most popular around. See our catalog for more information. The "Super Twister" kit (no longer available) was a complete kit that had everything you needed and included headers, mounts, transmission crossmember, hoses, springs, etc. The rear crossmember ran side to side and mounted to the Vega's stiffening ribs and used the stock rubber mount. Now only the headers and mounts are still available. However, you can still get the rest of the components (springs, hoses, etc.) through other sources. See our catalog for more information.
Every now and then Don Hardy accidentally ships the kits without instructions. Below are links to some printable instructions on our web site. If you also need to know what rubber mounts to use, you need 1966 Chevy truck small-block chevy mounts. Our experience with the rubber mounts has lead us to avoid mounts made in Korea as the bolt pattern often won't fit the engine without some difficulty. Also check that the center hole has threads for 7/16" - 14 bolts, avoid those that have 3/8" - 16.
Don Hardy instructions page 1
Don Hardy instructions page 2
Don Hardy instructions page 3
Don Hardy instructions page 4
This company may have also been known as Herbert & Meek.
Hooker small-block engine mounts P/N 12601 ('71-'74 cars) or P/N 12608 ('75-'80 cars).


Check out their Phase III Vega in the April '99 issue of Super Chevy magazine, or go to the Motion Performance homepage at
http://www.baldwinmotion.com.
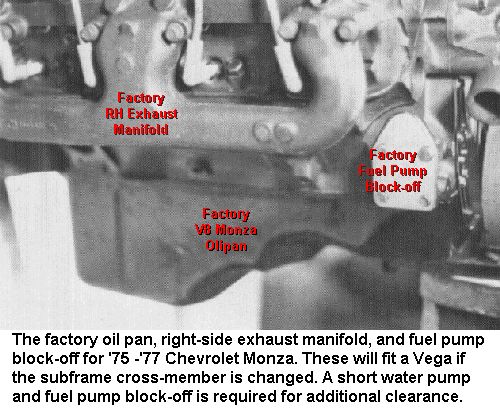
The factory oilpan has a notched place just in front of the rear sump for clearance of the steering drag-link. Also, it has a big-block style oil dipstick mount on the driver's side of the oilpan where the dipstick would enter through the side of the oilpan. Although the notch is a must to clear the H-Body steering drag-link, the dipstick option is really for use of the factory exhaust manifolds and is not required for any aftermarket kit that I know of.
To the right is a scan of how Hooker suggests you modify the pan. Notice the notch starts 3 1/2" from the front and is 6" long and 3 3/8" from the top. This is to clear the crossmember and the draglink. If you intend to use factory V8 Monza exhaust manifolds then the dipstick location may be a problem. However, I have seen an aftermarket oil dipstick assembly made by Lokar that uses a flexible stainless steel tube with stainless braided cover and aluminum billet dipstick (see a Summit Racing catalog).
Below is a scan of how Moroso constructs their V8 Vega/Monza pan (P/N 20230). Notice the notch starts from the front, is 9 1/2" long and 3 7/8" from the top. Note the dipstick location when you pick your oilpan being sure to select one that will meet your specific needs.
If looks aren't important and you want to save time and hassle, it may be possible to modify the oilpan without welding, but it will require care on your behalf to prevent damage to the engine or the oilpan. First take your existing oilpan and bolt it to your engine (no gaskets required). Bolting the pan to the engine will prevent the oilpan from warping while you shape it. Next, using the measurements provided here, use a rubber or wooden mallet and lightly tap the area of the oilpan to be modified. If I were to attempt this, I would fabricate a wooden shape that would fit inside the oilpan and still allow the pan to be bolted to the engine. Then while I hammered I could be sure that the wooden shape would prevent me from causing the oilpan to interfere with the reciprocating assembly. Of course the wooden shape would be removed once the reshaping was complete.
Although not required to mount a V8, remote mounted oil filter kits are a plus in any car with limited access and the H-Body is no exception. I personally prefer the dual remote kit, twice the filtering area and cleaner oil. Use a quality oil filter to protect your engine from contaminants and while you're installing the kit why not add an oil cooler as well.
The V8 Monza radiator requires modification to tackle engine cooling problems on V8 Vegas by relocating the upper outlet to the Vega location and mounting it 3 inches lower, requiring relocated lower radiator brackets on the Vega. Installing a larger radiator will also require a larger fan. Be sure to check fan shroud and radiator clearances before starting the engine, no sense in trashing a new fan or radiator. When looking in the factory parts manuals for these, you'll only find them in Group 1.219 of the Chevrolet Parts Catalog Models thru 1975 (Chevrolet Parts Publication, Book No. 11 and 11A).
Hooker big-block engine mounts P/N 12603.
TransDapt small-block engine mounts P/N ?????.
The TransDapt kit is very similar to the Adaptec and Hooker SBC kit. However, I have received reports from consumers who have tried this kit that some of the holes are in the wrong location preventing the brackets from bolting onto the engine. Folks have reported they had to cut re-drill and reweld these backets just to get them to work. Since these are front engine mounts, they will fit virtually all header designs.
Motion Performance Inc.
(no longer selling V8 Vega/H-Body kits)
Last known address...
P.O. Box 875
Baldwin, New York 11510-0597
Phone# (516) 223-3172 or Fax# (516) 223-2117
Custom/Fabricated
Some "Home Made" Solutions (e-mail me yours)
V8 Oil System
Factory Oilpan

Aftermarket Oilpans
Here are a few of the options available. I've been told that only the Milodon oilpan P/N 31070 will fit the Chevy 400/383 small-block engine and only if the factory connecting rods are used. Moroso's oilpan P/N 20230 will only fit up to a 3.48 stroke with steel rods, it will not fit the Chevy 400/383 engines. If you've used any other aftermarket V8 Vega/Monza pan on a 400/383 successfully e-mail me. Let me know if there are any other aftermarket oilpans or if any of these are no longer available.


Home Fabricated Oilpans
There are a number of aftermarket oilpan manufacturers, but you can easily make your own if you check the clearances and can weld. Just be sure to remember not to remove so much that the pan hits the reciprocating assembly.


Remote Mounted Oil Filters


V8 Radiator
Factory Radiator
The factory V8 Monza radiator is a 3 core unit that is 16.5" tall (3 inches higher than a 4 cylinder Vega single core unit) and it has an irregular tank that makes it 25.25" wide at the bottom and 26.25" wide at the top. The core is 21" wide. Note that factory V8 Monzas used short style Corvette water pumps.

4 cylinder Vega & V8 Monza radiator.
Monza radiator (pictured) is GM P/N 3033825 (Towne Cpe.) (262).
You can also use GM P/N 3031734 for Monza (8 Cyl.) (exc. Towne Cpe.).
Back to Building the V8 H-Body
http://www.v8monza.com
